The following is a guide to fabric-enabling (or grid-enabling) your existing Spring beans using Appistry EAF. We will use Maven for build configuration.
Pre-requisites to running the code sample provided:
- JDK 1.5+
- Appistry EAF 3.8 Release
- Maven 2.0.7+.
- An IDE to write/edit code. I use Eclipse 3.3.2 and the code in the zip file has eclipse-related files. But you could easily download the code and use it with an IDE of your choice.
- m2eclipse plugin – maven integration for Eclipse. *This is optional*, but if you are using Eclipse as your IDE, I recommend using it.
Installing the above software
See here on how to install Appistry EAF 3.8 Release on Cent OS, RHEL, and SuSE.
See here on how to install Appistry EAF 3.8 Release on Cent OS, RHEL, and SuSE.
Installation instructions for Java, Maven and Eclipse are provided on their respective web sites.
Creating the Maven project
This example is based on the tutorial samples (spring_hello_world – see tutorial_samples.zip or tutorial_samples.tgz) provided on this page.
Allright, let’s get started by designing some components:
HelloWorldSpringService – interface that exposes a single “greet” method. Remember – program to interfaces!
HelloWorldSpringServiceBean – provides the implementation for HelloWorldSpringService.
HelloWorldSpringClient – client that calls the HelloWorldSpringService.greet method
Since HelloWorldSpringService interface is implemented by HelloWorldSpringServiceBean and is used by HelloWorldSpringClient, let’s put HelloWorldSpringService into a common module, say HelloWorldCommon.
HelloWorldSpringServiceBean could go into a HelloWorldService module while HelloWorldSpringClient could go into a HelloWorldClient module.The above structure provides a clean separation between the interface, implementation(s), and the client.Now that we have the structure laid out, let’s start by creating these maven modules. I’m not going to use the m2eclipse plugin to create a multi-module project in eclipse, but instead will use mvn from the command line to create the modules. You are free to use the m2eclipse plugin to create the project and modules. Usage of m2eclipse is beyond the scope of this article.First, let’s create a project, HelloWorldSpring, that will be the parent of HelloWorldCommon, HelloWorldService, and HelloWorldClient. Open a shell, change to your eclipse workspace directory, type in the following command and hit enter:
mvn archetype:create
-DgroupId=com.appistry.samples
-DartifactId=HelloWorldSpring
The above command will create a HelloWorldSpring maven project.
* Non m2eclipse plugin users: If you do not plan on using m2eclipse, from the command line change directory to HelloWorldSpring directory, type the following command and hit enter:
mvn eclipse:eclipse
Since we want this to be the parent project, go ahead and delete the “src” directory under HelloWorldSpring. Next, edit the HelloWorldSpring’s pom.xml – change the packaging element’s value from jar to pom.
Next we need to create the HelloWorldCommon, HelloWorldService, and HelloWorldClient modules. Go back to your command line, and change directory to <workspace>/HelloWorldSpring. Type the following commands and hit enter:
mvn archetype:create -DgroupId=com.appistry.samples -DartifactId=HelloWorldCommon
mvn archetype:create -DgroupId=com.appistry.samples -DartifactId=HelloWorldService
mvn archetype:create -DgroupId=com.appistry.samples -DartifactId=HelloWorldClient
The above 3 commands create the HelloWorldCommon, HelloWorldService, and HelloWorldClient modules under <workspace>/HelloWorldSpring directory.
* Non m2eclipse plugin users: If you do not plan on using m2eclipse, from the command line change directory to HelloWorldSpring directory, type the following command and hit enter:
mvn eclipse:eclipse
Next, fire up Eclipse and select the workspace that you created the above maven project under. Now, create a new Project by clicking “File -> New -> Project…”. Select “General -> Project” and hit “Next”. Type “HelloWorldSpring” for Project Name and click “Finish”.
You should see, a HelloWorldSpring project with HelloWorldCommon, HelloWorldService, and HelloWorldClient under it.
If you plan on using m2eclipse plugin, now would be a good time to right-click on the project and select “Maven -> Enable Dependency Management” and then right-click again on the project and select “Maven -> Enable Nested Modules”.
* Non m2eclipse plugin users: Right-click “java” (under HelloWorldSpring -> HelloWorldCommon -> src -> main), select “Build Path -> Use as Source Folder”. Do the same for “java” under HelloWorldSpring -> HelloWorldService -> src -> main and HelloWorldSpring -> HelloWorldClient -> src -> main.Now you have the HelloWorldSpring multi-module project configured under Eclipse! See Figure 1
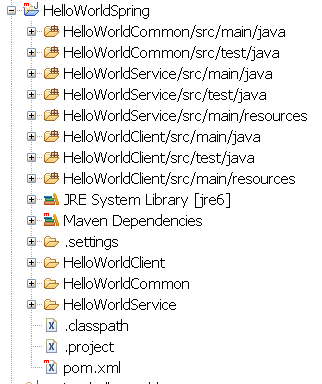
Figure 1
Next we need to update the poms.
HelloWorldSpring pom.xml
<?xml version=”1.0″ encoding=”UTF-8″?>
<project xmlns=”http://maven.apache.org/POM/4.0.0″ xmlns:xsi=”http://www.w3.org/2001/XMLSchema-instance” xsi:schemaLocation=”http://maven.apache.org/POM/4.0.0 http://maven.apache.org/maven-v4_0_0.xsd”>
<modelVersion>4.0.0</modelVersion>
<groupId>com.appistry.samples</groupId>
<artifactId>HelloWorldSpring</artifactId>
<packaging>pom</packaging>
<version>1.0.0-SNAPSHOT</version>
<name>HelloWorldSpring</name><properties>
<!– Default JDK Level –>
<jdkLevel>1.5</jdkLevel>
</properties><modules>
<module>HelloWorldService</module>
<module>HelloWorldClient</module>
<module>HelloWorldCommon</module>
</modules><dependencyManagement>
<dependencies>
<dependency>
<groupId>${project.groupId}</groupId>
<artifactId>HelloWorldCommon</artifactId>
<version>${project.version}</version>
</dependency>
</dependencies>
</dependencyManagement><dependencies>
<dependency>
<groupId>junit</groupId>
<artifactId>junit</artifactId>
<version>4.4</version>
<scope>test</scope>
</dependency>
</dependencies><build>
<pluginManagement>
<plugins>
<plugin>
<artifactId>maven-compiler-plugin</artifactId>
<!–<version>2.0.2</version>–>
<executions>
<execution>
<id>compile</id>
<phase>compile</phase>
<goals>
<goal>compile</goal>
</goals>
</execution>
<execution>
<id>unit-test-compile</id>
<goals>
<goal>testCompile</goal>
</goals>
</execution>
</executions>
<configuration>
<source>${jdkLevel}</source>
<target>${jdkLevel}</target>
</configuration>
</plugin><plugin>
<artifactId>maven-surefire-plugin</artifactId>
<version>2.4.2</version>
<configuration>
<excludes>
<exclude>**/*$*</exclude>
</excludes>
</configuration>
</plugin><plugin>
<groupId>org.apache.maven.plugins</groupId>
<artifactId>maven-antrun-plugin</artifactId>
<version>1.1</version>
</plugin><plugin>
<groupId>org.apache.maven.plugins</groupId>
<artifactId>maven-dependency-plugin</artifactId>
<version>2.0</version>
</plugin>
</plugins>
</pluginManagement>
</build></project>
HelloWorldService pom.xml
Add HelloWorldCommon dependency to HelloWorldService
<?xml version=”1.0″?>
<project>
<parent>
<artifactId>HelloWorldSpring</artifactId>
<groupId>com.appistry.samples</groupId>
<version>1.0.0-SNAPSHOT</version>
</parent> <modelVersion>4.0.0</modelVersion>
<artifactId>HelloWorldService</artifactId>
<name>HelloWorldService</name><dependencies>
<dependency>
<groupId>${project.groupId}</groupId>
<artifactId>HelloWorldCommon</artifactId>
<version>${project.version}</version>
</dependency>
</dependencies>
</project>
HelloWorldClient pom.xml
Add HelloWorldCommon dependency to HelloWorldClient. You will also need to add Spring as a dependency. I’m using Spring 2.5.4.
<?xml version=”1.0″?>
<project>
<parent>
<artifactId>HelloWorldSpring</artifactId>
<groupId>com.appistry.samples</groupId>
<version>1.0.0-SNAPSHOT</version>
</parent><modelVersion>4.0.0</modelVersion>
<artifactId>HelloWorldClient</artifactId>
<name>HelloWorldClient</name><dependencies>
<dependency>
<groupId>${project.groupId}</groupId>
<artifactId>HelloWorldCommon</artifactId>
<version>${project.version}</version>
</dependency>
<dependency>
<groupId>org.springframework</groupId>
<artifactId>spring</artifactId>
<version>2.5.4</version>
</dependency>
<dependency>
<groupId>commons-logging</groupId>
<artifactId>commons-logging</artifactId>
<version>1.1.1</version>
</dependency>
</dependencies>
</project>
Now we are ready to code the HelloWorldSpringService, HelloWorldSpringServiceBean, and HelloWorldSpringClient.
HelloWorldSpringService
The HelloWorldSpringService has one method greet which takes a String parameter.
package com.appistry.samples.spring.helloworld;

public interface HelloWorldSpringService {
    String greet(String name);
}
This interface goes under the HelloWorldCommon module under HelloWorldCommon/src/main/java.
HelloWorldSpringServiceBean
The HelloWorldSpringServiceBean class implements HelloWorldSpringService interface. It goes under the HelloWorldService/src/main/java.
package com.appistry.samples.spring.helloworld.impl;

import com.appistry.samples.spring.helloworld.HelloWorldSpringService;

public class HelloWorldSpringServiceBean implements HelloWorldSpringService {

	public String greet(String name) {
		return "Hello World, " + name;
	}
}
HelloWorldSpringClient
Next, add the client that calls HelloWorldSpringService.greet. HelloWorldSpringClient class goes under HelloWorldClient/src/main/java.
package com.appistry.samples.spring.helloworld;

import org.springframework.context.support.ClassPathXmlApplicationContext;

public class HelloWorldSpringClient {

    public static void main(String[] args) {
	ClassPathXmlApplicationContext appContext = new ClassPathXmlApplicationContext("helloWorldClient-appContext.xml");

        HelloWorldSpringService localHWS = (HelloWorldSpringService) appContext.getBean("localHelloWorldBean");
System.out.println(localHWS.greet("locally."));

    }
}
helloWorldClient-appContext.xml is detailed below and it goes under HelloWorldClient/src/main/resources (add the “resources” directory under HelloWorldClient/src/main as a “source” folder in Eclipse):
<?xml version=”1.0″?>
<!DOCTYPE beans PUBLIC “-//SPRING//DTD BEAN//EN” “http://www.springframework.org/dtd/spring-beans.dtd”><beans>
<bean id=”localHelloWorldBean” class=”com.appistry.samples.spring.helloworld.impl.HelloWorldSpringServiceBean”/>
</beans>
Let’s package, install and run HelloWorldSpring. From the command, type the following command from under <workspace>/HelloWorldSpring to package and install HelloWorldSpring artifacts to your local maven repository.
mvn clean install
From Eclipse, run HelloWorldSpringClient as a Java Application. You should see an output like this:
…
…
Jun 20, 2008 4:35:26 PM org.springframework.beans.factory.support.DefaultListableBeanFactory preInstantiateSingletons
INFO: Pre-instantiating singletons in org.springframework.beans.factory.support.DefaultListableBeanFactory@18a7efd: defining beans [localHelloWorldBean,fabricHelloWorldBean,fabric]; root of factory hierarchy
Hello World, locally.
The HelloWorldSpringClient application loads the helloWorldClient-appContext.xml spring application context, gets a reference to the HelloWorldSpringServiceBean and calls the greet method on it. So far we have seen nothing with regards to the fabric/grid. If you would like to take a break, now would be a good time to do so. Go on. I’ll be right here.
Exposing the HelloWorldSpringServiceBean as a fabric bean
To expose our existing HelloWorldSpringServiceBean in the fabric, we need to package and deploy the HelloWorldSpringServiceBean into the fabric.
Let’s begin by first defining the HelloWorldSpringServiceBean in a spring application context (spring_hello_world_bean.xml).
<?xml version=”1.0″?>
<!DOCTYPE beans PUBLIC “-//SPRING//DTD BEAN//EN” “http://www.springframework.org/dtd/spring-beans.dtd”><beans>
<bean id=”HelloWorldBean” class=”com.appistry.samples.spring.helloworld.impl.HelloWorldSpringServiceBean”/>
</beans>
Place this file under HelloWorldService/src/main/resources
Note: Do we need to expose this in the fabric as a spring bean? No. We could have exposed it as a regular POJO. But the purpose of this example is to show Spring integration with Appistry EAF.
Now that we have wired the HelloWorldSpringServiceBean in a spring container, we need to define this bean as a Fabric Java Component. This is accomplished using the EAF Component Definition XML.
springHWSvc-component-defn.xml
<?xml version=”1.0″ encoding=”utf-8″?>
<java-components xmlns=”http://www.appistry.com/ns/component” xmlns:xsi=”http://www.w3.org/2001/XMLSchema-instance” xsi:schemaLocation=”http://www.appistry.com/ns/component eaf-component.xsd”><component name=”mvnSpringHWSvcComponent” default-timeout=”5″>
<spring-bean name=”HelloWorldBean”/>
</component>
</java-components>
where,
the name attribute of the spring-bean element should match the bean id defined in the spring_hello_world_bean.xml spring application context. In this case, HelloWorldBean.
The default-timeout specifies how long to wait for a call (to a method) to return before timing out. In this case, we have specified 5 seconds.
Place this file under HelloWorldService/src/main/scripts for now.
So how does the EAF tie the component definition file and the spring application context? This is done via the EAF Fabric Application Definition XML.The fabric application definition file describes the various files that comprise a EAF fabric application. This file is used by the Fabric Package (which we will encounter momentarily) to bundle these files into “.fabric” package.
springHWSvc-fabric-app-defn.xml
<?xml version=”1.0″?>
<!DOCTYPE app SYSTEM “FabricApp.dtd”><app name=”mvnSpringHelloWorldSvc” version=”1.0.0″>
<spring>
<bean-factory-locator bean=”myBeanFactory” resource-location=”beanRefFactory.xml”/>
</spring><components>
<file name=”springHWSvc-component-defn.xml”/>
</components><java-libs>
<file name=”HelloWorldCommon.jar”/>
<file name=”HelloWorldService.jar”/>
<file name=”spring.jar”/>
<file name=”commons-logging.jar”/>
</java-libs>
</app>
where,
components, file – is component definition file that we defined earlier
java-libs – dependant java libraries that will be included in the .fabric application.
Place this file under HelloWorldService/src/main/scripts
The interesting element in this file is the . The bean-factory-locator element provides the Fabric with an implementation of Spring BeanFactory to enable it to access spring bean containers / application contexts. The BeanFactory (provided to the Fabric) is itself described in a spring application context. In this case, beanRefFactory.xml.
beanRefFactory.xml
<?xml version=”1.0″ encoding=”UTF-8″?>
<!DOCTYPE beans PUBLIC “-//SPRING//DTD BEAN//EN” “http://www.springframework.org/dtd/spring-beans.dtd”><beans>
<bean id=”myBeanFactory” class=”org.springframework.context.support.ClassPathXmlApplicationContext”>
<constructor-arg value=”spring_hello_world_bean.xml”/>
</bean>
</beans>
The bean id in beanRefFactory.xml should match the “bean” attribute of bean-factory-locator in the fabric application definition xml. In this case, myBeanFactory.
In the above application context, we have configured the ClassPathXmlApplicationContext (a super set of the BeanFactory) and pass it the name of the application context, spring_hello_world_bean.xml, that contains our HelloWorldSpringServiceBean.
Place the beanRefFactory.xml under HelloWorldService/src/main/resources
Now we are ready to package our HelloWorldSpringServiceBean, so we can deploy it on the fabric. As you can see we have not modified the java code at all. All we have done so far is configure the HelloWorldSpringServiceBean POJO in a spring application context, describe the bean as a fabric Java component, and tie these elements (along with the BeanFactory) together using a fabric definition file. Non-intrusive, eh?
Build and Package HelloWorldSpringServiceBean
Packaging the application into .fabric file can be accomplished using the fabric pkg command. The fabric package command takes a fabric application definition file as input and bundles the application files into a single package (.fabric). We can configure the fabric package in the HelloWorldService pom.xml. But before we do this, we need to first download the dependant jars listed in the java-libs section of the fabric application definition xml (springHWSvc-fabric-app-defn.xml) to a particular directory. This can be defined in the HelloWorldService pom.xml as well. Add the following snippet (after the dependencies element and before the closing project tag) to the HelloWorldService pom.xml:
<build>
<plugins>
<plugin>
<groupId>org.apache.maven.plugins</groupId>
<artifactId>maven-dependency-plugin</artifactId>
<version>2.0</version>
<executions>
<execution>
<id>copy-required-dependencies</id>
<phase>install</phase>
<goals>
<goal>copy</goal>
</goals>
<configuration>
<stripVersion>true</stripVersion>
<artifactItems>
<artifactItem>
<groupId>${project.groupId}</groupId>
<artifactId>HelloWorldCommon</artifactId>
<version>${project.version}</version>
</artifactItem>
<artifactItem>
<groupId>${project.groupId}</groupId>
<artifactId>${project.artifactId}</artifactId>
<version>${project.version}</version>
</artifactItem>
<artifactItem>
<groupId>org.springframework</groupId>
<artifactId>spring</artifactId>
<version>2.5.4</version>
</artifactItem>
<artifactItem>
<groupId>commons-logging</groupId>
<artifactId>commons-logging</artifactId>
<version>1.1.1</version>
</artifactItem>
</artifactItems>
<outputDirectory>${project.build.directory}/fabric-package</outputDirectory>
</configuration>
</execution>
</executions>
</plugin>
</plugins>
</build>
This directs Maven (at install phase) to copy the HelloWorldCommon, HelloWorldService, spring and commons-logging jar files (with the versions stripped) from the local maven repository to the fabric-package directory under HelloWorldService/target directory. Since I’ve listed the jar files without version numbers in the element (in springHWSvc-fabric-app-defn.xml file), I tell Maven to strip the version numbers from the jar files while it’s performing the copy.
Now that we have addressed the jar dependencies, we are ready to configure the fabric_pkg command. Let’s configure the fabric package in ant build file target and call the ant build file from maven.
Note: You don’t have to necessarily configure the fabric_pkg in an ant build file. You could have configured it within the pom itself.
First let’s check out the ant build file.
build.xml (goes under HelloWorldService/src/main/scripts) – just displaying the necessary snippets. The attached HelloWorldSpring-source.zip contains all the source code listed here.
<!– copy the fabric application defn xml and component defn xml to fabric-package directory –>
<target name=”init”>
<copy todir=”target/fabric-package”>
<fileset dir=”src/main/scripts”>
<include name=”**/*-defn.xml”/>
</fileset>
</copy>
</target><!– execute fabric-pkg command –>
<target name=”fabric-package” depends=”init”>
<exec executable=”fabric_pkg”>
<arg line=”target/fabric-package/springHWSvc-fabric-app-defn.xml” />
</exec>
</target>
Now we need to update the HelloWorldService pom.xml to call the above ant build file. Add the following snippet (after the previous plugin definition and before the closing plugins tag) to the HelloWorldService pom.xml.
<plugin>
<groupId>org.apache.maven.plugins</groupId>
<artifactId>maven-antrun-plugin</artifactId>
<version>1.1</version>
<executions>
<execution>
<id>fabric-package</id>
<phase>install</phase>
<goals>
<goal>run</goal>
</goals>
</execution>
</executions>
<configuration>
<tasks>
<ant antfile=”src/main/scripts/build.xml” target=”fabric-package” />
</tasks>
</configuration>
</plugin>
Here we direct Maven (again, at install phase) to call the “fabric-package” target of build.xml. The fabric-package target first copies the springHWSvc-fabric-app-defn.xml and springHWSvc-component-defn.xml files to the HelloWorldService/target/fabric-package directory and then calls the fabric_pkg executable to bundle the application files into “mvnSpringHelloWorldSvc.fabric” file. You will notice that the name of the fabric file is the same as the name attribute of the app element in springHWSvc-fabric-app-defn.xml.
We are done with the package configuration. Now, open a command shell, change directory to /HelloWorldSpring, type the following command and hit enter:
mvn clean install
The above command will compile the sources, the application jars, install the application jars to the local maven repository on your local machine, and then create the mvnSpringHelloWorldSvc.fabric under the HelloWorldSpring/HelloWorldService directory.
Now you are ready to deploy the mvnSpringHelloWorldSvc.fabric to the EAF fabric.
Deploy HelloWorldSpringServiceBean
Let’s use the instructions detailed on the Appistry EAF wiki page – Building, Packaging, and Deploying a Fabric application. The fabric_ctl command can be used to deploy a fabric application.
To deploy the HelloWorldSpringServiceBean bundled in the mvnSpringHelloWorldSvc.fabric, type the following command (from under <workspace>/HelloWorldSpring/HelloWorldService) with the correct fabric adminstrative user, password, and fabric address. If you have stuck with the defaults, the command is:
fabric_ctl -d 239.255.0.1:30000 -u fabric-admin/fabric-admin deploy mvnSpringHelloWorldSvc.fabric
You can verify if the deployment is successful or not by following the instructions on this wiki page.
If the above command didn’t throw any errors, you have successfully deployed the HelloWorldSpringServiceBean, without any code changes, to the fabric.
Now that we have HelloWorldSpringServiceBean deployed to the fabric, how do we call the greet method on it from HelloWorldSpringClient?
Call HelloWorldSpringServiceBean remotely
Calling HelloWorldSpringServiceBean from HelloWorldSpringClient is achieved by a simple configuration in helloWorldClient-appContext.xml. And adding Appistry EAF provided fabric.jar as a dependency to the HelloWorldClient pom.xml
Since Appistry EAF fabric.jar is not available on a public maven repository as of yet, we need to install it to our local maven repository on our local machine. To do this, open a command shell, change directory to $FABRIC_HOME/classes, type the following command and hit enter:
mvn install:install-file -Dfile=fabric.jar -DgroupId=com.appistry -DartifactId=fabric -Dversion=3.8.0.15 -Dpackaging=jar
The above command will install fabric.jar to your local maven repository.
Next we need to add fabric.jar as a dependency to HelloWorldClient’s pom.xml:
<dependency>
<groupId>com.appistry</groupId>
<artifactId>fabric</artifactId>
<version>3.8.0.15</version>
</dependency>
Now we are ready to configure helloWorldClient-appContext.xml.
Append the following bean definitions to helloWorldClient-appContext.xml located under <workspace>/HelloWorldSpring/HelloWorldClient:
<bean id=”fabricHelloWorldBean” class=”com.appistry.spring.FabricProxyFactoryBean”>
<property name=”serviceInterface” value=”com.appistry.samples.spring.helloworld.HelloWorldSpringService”/>
<property name=”fabric”>
<ref local=”fabric”/>
</property>
<property name=”applicationName” value=”mvnSpringHelloWorldSvc”/>
<property name=”componentName” value=”mvnSpringHWSvcComponent”/>
</bean><bean id=”fabric” class=”com.appistry.fabric.Fabric”>
<constructor-arg value=”239.255.0.116″/>
<constructor-arg value=”31000″/>
</bean>
The bean fabricHelloWorldBean defines a com.appistry.spring.FabricProxyFactoryBean which proxies any calls made on HelloWorldSpringService to an instance of HelloWorldSpringService on the fabric. The concept behind FabricProxyFactoryBean is very similar to Spring Remoting. Infact FabricProxyFactoryBean uses Spring Remoting classes to proxy requests to the fabric.
The FabricProxyFactoryBean requires:
- the interface on which methods will be called,
- a reference to com.appistry.fabric.Fabric,
- an applicationName which should match the name attribute of the app element in the fabric application definition xml (springHWSvc-fabric-app-defn.xml),
- a componentName which should match the name attribute of the component element in the component definition xml (springHWSvc-component-defn.xml).
Let’s now add some code to HelloWorldSpringClient to call the fabricHelloWorldBean that we just defined above.
Let’s append the following two lines to the HelloWorldSpringClient’s main method:
HelloWorldSpringService fabricHWS = (HelloWorldSpringService) appContext.getBean("fabricHelloWorldBean");
System.out.println(fabricHWS.greet("from the fabric."));
Now we are ready to run HelloWorldSpringClient once again.
From Eclipse, run HelloWorldSpringClient as a Java Application. You should see an output like this:
…
…
Jun 20, 2008 4:35:26 PM org.springframework.beans.factory.support.DefaultListableBeanFactory preInstantiateSingletons
INFO:
Pre-instantiating singletons in
org.springframework.beans.factory.support.DefaultListableBeanFactory@18a7efd:
defining beans [localHelloWorldBean,fabricHelloWorldBean,fabric]; root
of factory hierarchy
Hello World, locally.
Hello World, from the fabric.
The HelloWorldSpringClient application loads the helloWorldClient-appContext.xml spring application context, gets a reference to the fabricHelloWorldBean and calls the greet method on it. The FabricProxyFactoryBean proxies the greet request to the fabric. An instance of HelloWorldSpringServiceBean on the fabric executes the greet method and returns the results to the HelloWorldSpringClient which prints the result to the standard out.
As you can see, we haven’t changed any code on the client either. Just a little bit of configuration and that was it.
Download
Extract the contents of the zip into your eclipse workspace. This will create a HelloWorldSpring folder under your workspace.
Appistry EAF Developer Portal
To learn more visit the Appistry EAF Developer Portal